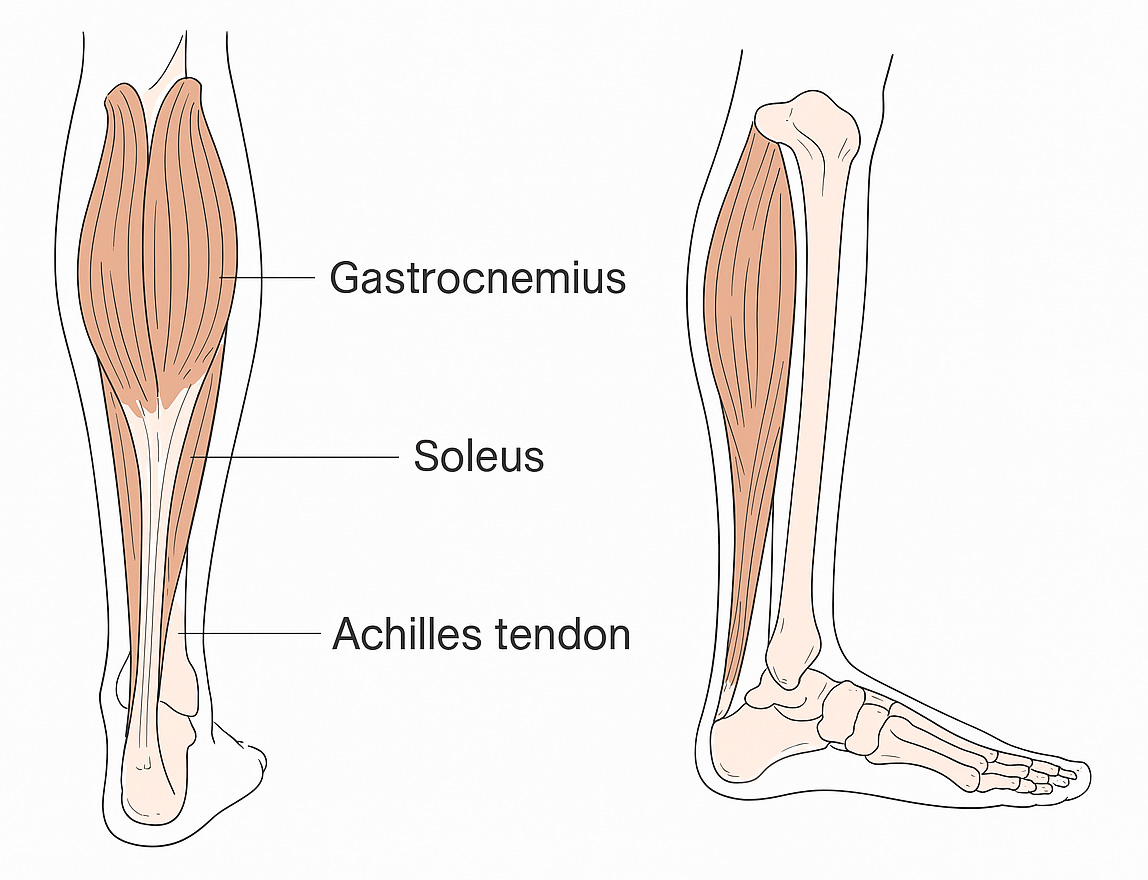
 The Achilles tendon is the largest tendon in your body, connecting the calf muscles to your heel bone. These muscles help you point your foot downward, stand on your tiptoes, and move forward when walking, running, or jumping.
A rupture occurs when the tendon is suddenly stressed. Many people feel pain at the back of the ankle and may hear a ‘pop’ or feel as if they’ve been kicked. It often happens during sports involving running and jumping, but can also result from a fall or slip.
Recovery
It often takes a year or more to fully recover from a ruptured tendon and return to previous fitness or activity levels.
How is this injury treated?
- Many Achilles tendon ruptures are treated without surgery, using a VACOped boot and an early rehabilitation programme (early physiotherapy and weight bearing).
- Sometimes surgery is required, but the VACOped boot and early rehabilitation programme are still used after the operation.
- With the correct early rehabilitation programme, results are very similar for surgical and non-surgical treatment when there is a small gap between the ruptured tendon ends.
Precautions while in the boot
- The boot must be worn 24 hours a day, except when washing your foot.
- Only remove the boot while lying down. When the boot is off, do not put weight on your foot or let it touch the floor; keep your toes pointing down.
- The boot must be worn at night.
- Do not remove the boot for showers or baths; use a waterproof cast protector to keep it dry.
- The injury increases the risk of developing a blood clot (DVT), which can cause leg pain, swelling, and warm, red skin. You may be recommended blood thinning medication. If you have symptoms of a clot, go to your nearest Emergency Department.
- The VACOped boot allows you to put weight on your leg while wearing it, which helps the tendon get stronger as it heals.
- Your foot will be positioned pointing downwards, with gradual adjustments to the boot angle as healing progresses.
- You will be in the boot for 8 weeks and must wear it at all times, including overnight. You can put as much weight through your leg as is comfortable while wearing the boot.
Looking after yourself and your boot
- Use the pump on your boot every morning and when refitting it.
- Do not wear a sock under the boot liner, as this increases the risk of pressure areas and skin irritation.
- Problems such as pressure sores or skin irritation can occur, especially if you have diabetes or nerve problems. Check your skin when you have the boot off to wash your foot. Use a protective plaster or soft padding if needed. Keep your toes pointed down at all times when the boot is off.
- If your hips or back are sore due to uneven walking, consider products like wedges or an Even-up shoe for your non-affected leg.
- The boot sole can be removed at night to keep your sheets clean. Remove by pressing the two buttons near the heel; when putting the sole back on, you will hear a ‘click’ when it is correctly in place. Do not put weight through your leg when the sole is off. If you prefer not to remove the sole overnight, cover the boot with a pillowcase in bed.
Changing and washing the liner
- Two or three times a week, when removing your boot or changing the liner to wash it, shake the inner liner to spread the beads equally. This ensures the boot works correctly and avoids pressure areas.
- To change the cushion liner, unzip it, remove the inner liner, and put it into a clean cushion liner. Make sure each section of the inner liner is in the appropriate pouch and the valve comes out through the designated hole. Zip it back and put it on.
- You can wash the cushion liner (but not the inner liner) in the washing machine up to 60°C.
Putting on your boot
- Always do this lying down.
- Open the valve cap and pull the green valve ring upwards.
- Undo each boot strap, Velcro each strap to itself, and remove the upper shell.
- Shake and smooth out the liner, then Velcro the liner around your foot, next to your skin.
- Put your foot in the lower shell and pull the fabric liner upwards, as if pulling on a sock. Make sure your foot is positioned in the back of the liner and boot shell.
- Attach the upper shell, keeping the valve uncovered. The bottom of the upper shell should be inside the lower shell, and the top outside.
- Close straps in the right order (numbered under each strap). Straps should be comfortable but not loose.
- Push the green valve ring downwards, attach the suction pump, and squeeze until the pump no longer inflates. Close the valve cap.
Adjusting the boot angle
- Your VACOped boot will need to have the angle adjusted at certain times. Your physiotherapist will discuss whether you adjust the angle yourself or if it will be done at a physiotherapy appointment.
- Bring your boot vacuum pump to each appointment.
Early rehabilitation and exercises
- For the first 2 weeks after your injury, walk little and often while in the boot to limit muscle weakening and joint stiffness, and reduce the risk of blood clots.
- Rest regularly and elevate your foot to manage swelling.
- Use walking aids (e.g., crutches) if needed, but you do not need to use them if you can walk safely and comfortably without.
- After 2 weeks, increase your walking distance/time as able.
Initial exercises with your boot on
Do these up to 3 times per day, while wearing your boot. Aim for up to 10 repetitions, repeating for up to 3 sets with 1 minute rest in between.
- Toe curls: Lie with your injured leg elevated. Move your toes up and down in your boot.
- Straight leg raise: Lie with your legs straight out. Tighten your thigh muscles, keep your knee straight, and lift your leg 20cm off the bed. Hold for 5 seconds.
- Side leg lift: Lie on your non-injured side. Keep your injured leg straight and lift it upwards, then lower.
- Knee extension: Sit in a chair. Lift your foot up and straighten your knee, then lower slowly.
Treatment Timeline
| Week | Boot Instructions |
|---|---|
| 1 | Boot fixed at 30° with wedge sole. Weight bearing as able. Use crutches if necessary. |
| 2 | Boot fixed at 30° with wedge sole. Weight bearing as able. Use crutches if necessary. |
| 3 | Boot range of movement to be adjusted to 20°–30° with wedge sole. |
| 4 | Boot range of movement to be adjusted to 10°–30° with flat sole. |
| 5 | Boot range of movement to be adjusted to 0°–30° with flat sole. |
| 6 | Boot range of movement to be adjusted to 0°–30° with flat sole. |
| 7 | Boot range of movement to be adjusted to 0°–30° with flat sole. |
| 8 | Remove boot. Use shoes with heel raise at all times when standing. |
| 9 | Remove boot. Use shoes with heel raise at all times when standing. |
Physiotherapy
- You will be referred to outpatient physiotherapy, with your first appointment around week 3 after your injury.
- You will receive advice and further exercises for your ankle, leg, and general fitness.
- It is very important to follow your physiotherapist’s guidance throughout rehabilitation and when returning to usual activities or sports.
- After the boot is removed, your physiotherapist will guide you on gradually increasing activity to safely strengthen your Achilles tendon.
- The tendon is at highest risk of re-rupture in the early stages after the boot is removed, so follow all guidelines and advice.
- Full recovery may take a year or more.
Contacts
- Physiotherapy Department: 01324 673890
- Fracture Clinic: 01324 566452 / 566000